在一般场景下,通过以下几个步骤我们就可以为 ASP.NET MVC 工程添加 Forms Authentication(表单认证)的支持。
1. 新建工程
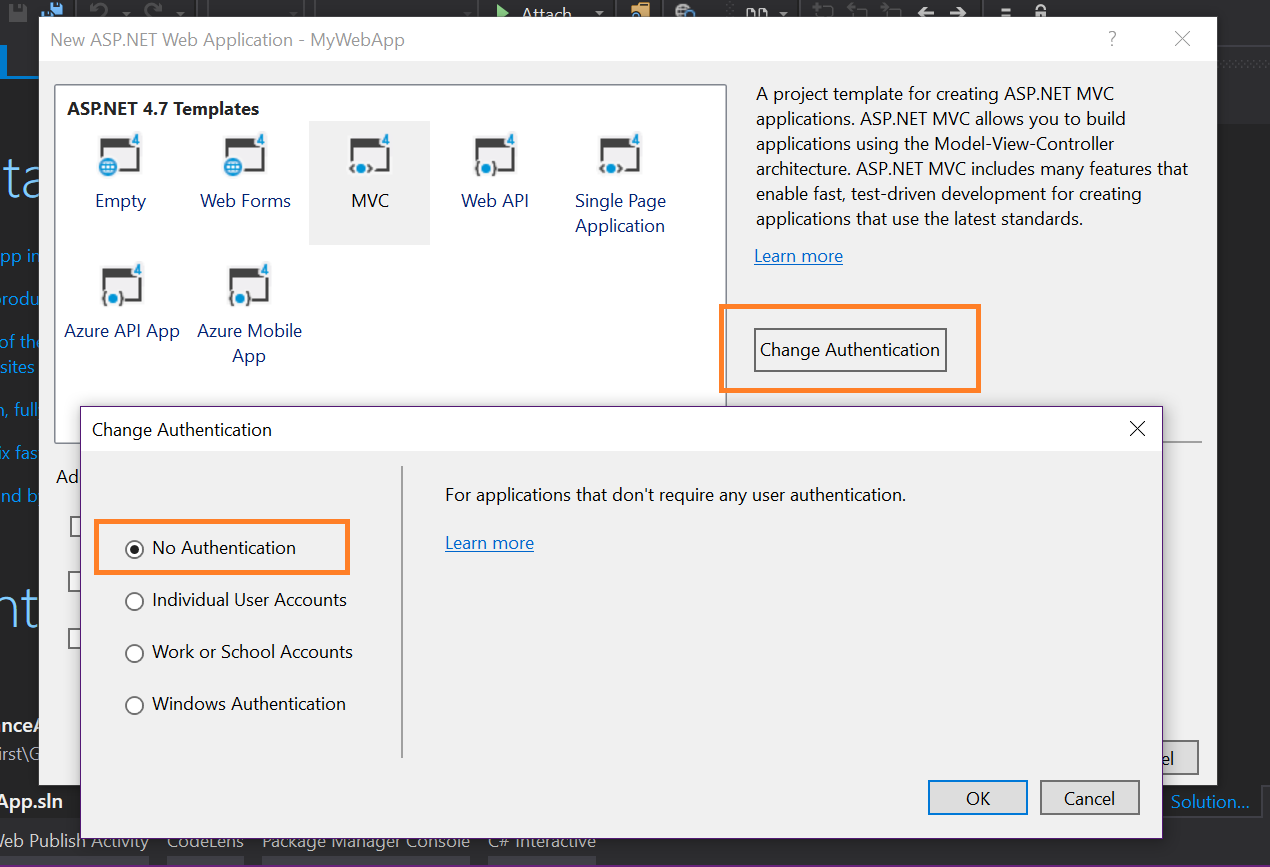
首先,在创建新的 APS.NET MVC Web 工程时,请将默认的认证方式修改为 “No authentication”(无认证)
2. 修改配置文件
在项目的 Web.config 文件中 system.web 节点下添加 Forms 认证节点的配置:
    <authentication mode="Forms">
      <forms name=".MyAppFormToken"
             loginUrl="~/login/index"
             defaultUrl="~/home/index"
             requireSSL="false"
             protection="All"
             path="/"
             domain=""
             timeout="30"
             slidingExpiration="true"
             cookieless="UseCookies"
             enableCrossAppRedirects="false" />
    </authentication>
上述配置参数的意义如下:
- name 属性用于配置 Forms Authentication 验证后,保存用户凭证 Cookie 的名字。
- loginUrl 属性用于配置用户没有登陆时,默认的页面 URL。
* 当调用 FormsAuthentication.RedirectToLoginPage() 方法时,客户端请求将被重定向到该属性所指定的页面。- defaultUrl 属性用于配置用户正确登录后,在没有指向页的情况下,默认的页面 URL。
- requireSSL 属性用于配置在进行 Forms Authentication 时,与服务器交互是否要求使用 SSL。
- protection 属性用于配置 Cookie 的保护模式,可设置的值包括:
- All(同时进行加密和数据验证)
- Encryption(仅加密)
- Validation(仅进行数据验证)
- None
* 出于安全考虑,该属性不应设置为 None。
- path 属性用于配置 Cookie 的路径。
- domain 属性用于配置 Cookie 的域。
- timeout 属性用于配置 Cookie 的过期时间。
- slidingExpiration 属性用于配置是否启用“弹性过期时间”,如果该属性设置为 false,则从首次验证之后,经过 timeout 时间后 Cookie 即过期;如果该属性为 true,则从最后一次用户请求开始,经过 timeout 时间才过期。
这意味着,在首次验证后,如果保证每 timeout 时间内,至少发送一个请求,则 Cookie 将永远不会过期。- cookieless 属性用于配置是否使用 Cookie 以及 Cookie 的相关行为。
Forms Authentication 可以采用两种方式在 HTTP 会话中保存用户的凭据信息,一种是使用 Cookie,即将用户凭据记录到 Cookie 中,每次发送请求时浏览器都会将该 Cookie 提供给服务器。
另一种方式是使用URI,即将用户凭据当作 URL 中额外的查询字符串传递给服务器。该属性有四种取值:
- UseCookies 无论何时都使用 Cookie
- UseUri 从不使用 Cookie,仅使用 URI
- AutoDetect 检测设备和浏览器,只有当设备支持 Cookie 并且在浏览器中启用了 Cookie 时才使用 Cookie
- UseDeviceProfile 只检测设备,只要设备支持 Cookie 不管浏览器是否支持,都是用 Cookie
* 通过 FormsAuthentication.CookiesSupported 属性可以得到对于当前请求是否使用 Cookie 传递用户凭证。
- enableCrossAppRedirects 属性用于配置是否可以将以进行了身份验证的用户重定向到其他应用程序中。
* 出于安全考虑,通常总是将该属性设置为 false。
3. 登陆、登出与回显用户名
登陆
在你的登陆 Action 中,验证用户名与密码正确后,添加如下代码,设置 Forms 验证 Cookie:
- 方式 1(推荐):
FormsAuthentication.SetAuthCookie(model.Name, model.IsRememberMe);为一个提供的用户名创建一个身份验证凭据,并把它添加到 Response 请求响应的 Cookie 中。
或
- 方式 2:
FormsAuthentication.RedirectFromLoginPage(model.Name, model.IsRememberMe);添加 Cookie,并将经过身份验证的用户重定向回最初请求的 URL 或默认 URL(我们在 Web.Config 中配置的 defaultUrl 的地址)。
回显用户名
我们可以通过 Context.User.Identity.IsAuthenticated 来判别当前用户是否已经登陆,而通过 Context.User.Identity.Name 则可以得到当前已登陆用户的用户名。
登出
如果需要退出登录,则直接在对应的退出登录 Action 中,调用
FormsAuthentication.SignOut();
即可。
4. 访问权限隔离
通过以上步骤,我们事实上已经完成了对 Forms 认证的配置过程。不过你会发现,虽然已经有了登陆、登出以及回显已登录用户名的功能,但是我们的 Home/Index 与 Login/Index 的访问权限是一样的!也就是说,即使没有登陆,你依然可以访问 Home/Index,如何才能进行权限的隔离呢?
- 方式 1:
只需要在需要进行访问限制的 Action 或 Controller 头上添加 [Authorize] 标签
- 方式 2(推荐):
直接在 FilterConfig.cs 的 RegisterGlobalFilters() 方法中添加如下代码:
filters.Add(new AuthorizeAttribute());这相当于为所有 Web 工程内的 Action 都添加了 [Authorize] 标签,对于我们需要允许用户匿名访问的 Action,请添加 [AllowAnonymous] 标签,比如我们的登陆 Controller。
[AllowAnonymous]
public class LoginController : BaseController { ... }
这里建议选择方式 2,设置后你将发现,在用户没有登陆的情况下,访问任何没有设置 [AllowAnonymous] 标签的位置,都将被重定向到登录页。
你可以从 GitHub 查看上述的演示代码:(Project: MyWebApp)
https://github.com/imnista/MyWebAppDemo
与默认创建的 MVC 工程相比,改动只局限于以下文件:
- Web.config
- App_Start/FilterConfig.cs
- Controllers/LoginController.cs
- Views/Shared/_Layout.cshtml
- Views/Login/Index.cshtml
- Models/UserModel.cs
* 一些改进
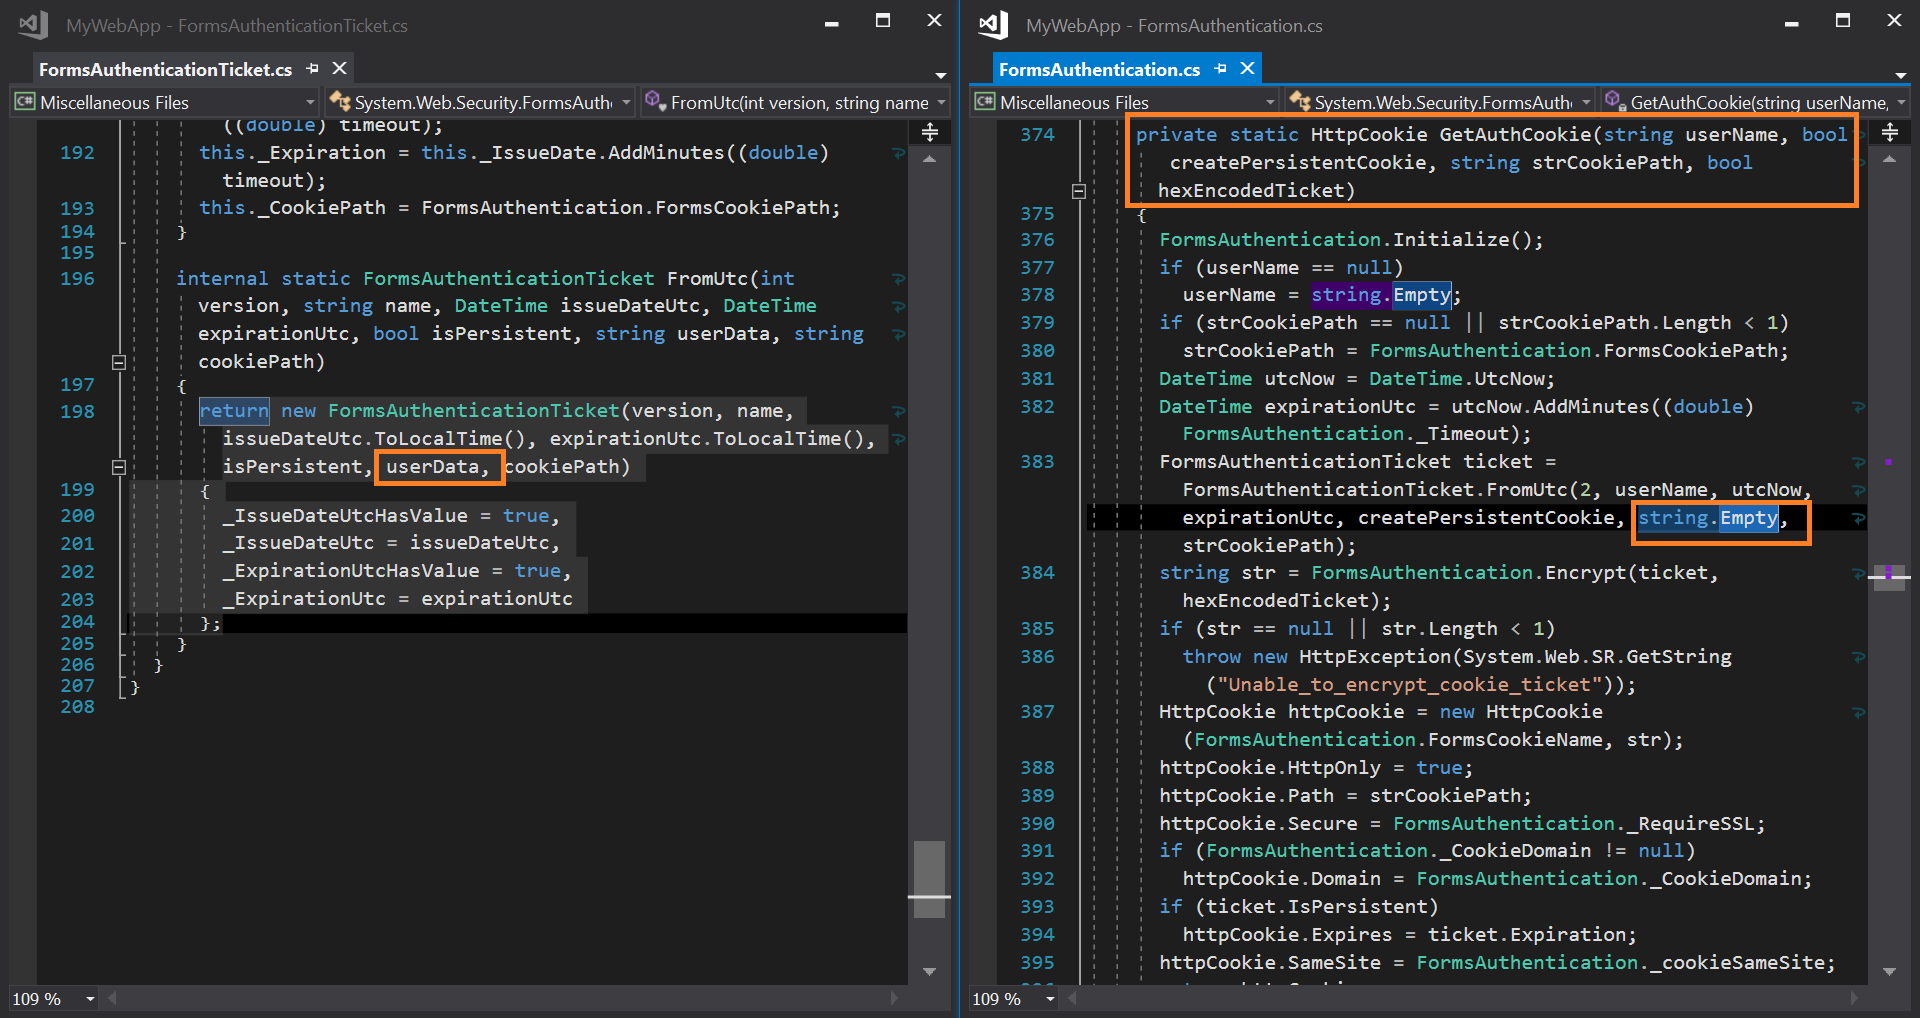
接下来,我们可能会发现这样一个问题,通过 FormsAuthentication.SetAuthCookie() 方法我们只能为 Cookie 设置当前用户的身份 ID(用户名),每次如果需要用户更多的属性信息,则需要从数据库中现用现加载,对于一些非常常用的信息,比如用户的显示名,能否直接将其集成到这个 Forms 认证 Cookie()中呢?
首先,.NET 类库并没有提供类似下边这个重载,所以我们只能自行去实现。
public static void SetAuthCookie(
        String userName,
        bool createPersistentCookie,
        string userData) { ... }
查看 .NET 的源代码,其实现过程并不复杂,只可惜微软给 userData 传递了 string.Empty
(1) 在 Controller 中,添加自定义的 SetAuthCookie 方法
        private static void SetAuthCookie(
            string userName,
            bool createPersistentCookie,
            object userData)
        {
            if (!System.Web.HttpContext.Current.Request.IsSecureConnection && FormsAuthentication.RequireSSL)
            {
                throw new HttpException("Connection not secure creating secure cookie");
            }

            // <!> In this way, we will lose the function of cookieless
            //var flag = UseCookieless(
            //    System.Web.HttpContext.Current,
            //    false,
            //    FormsAuthentication.CookieMode);

            FormsAuthentication.Initialize();
            if (userName == null)
            {
                userName = string.Empty;
            }
            var cookiePath = FormsAuthentication.FormsCookiePath;
            var utcNow = DateTime.UtcNow;
            var expirationUtc = utcNow + FormsAuthentication.Timeout;
            var authenticationTicket = new FormsAuthenticationTicket(
                2,
                userName,
                utcNow.ToLocalTime(),
                expirationUtc.ToLocalTime(),
                createPersistentCookie,
                JsonConvert.SerializeObject(userData),
                cookiePath
            );

            var encryptedTicket = FormsAuthentication.Encrypt(authenticationTicket);
            if (string.IsNullOrEmpty(encryptedTicket))
            {
                throw new HttpException("Unable to encrypt cookie ticket");
            }
            var authCookie = new HttpCookie(FormsAuthentication.FormsCookieName, encryptedTicket)
            {
                HttpOnly = true,
                Path = cookiePath,
                Secure = FormsAuthentication.RequireSSL
            };

            if (FormsAuthentication.CookieDomain != null)
            {
                authCookie.Domain = FormsAuthentication.CookieDomain;
            }
            if (authenticationTicket.IsPersistent)
            {
                authCookie.Expires = authenticationTicket.Expiration;
            }

            System.Web.HttpContext.Current.Response.Cookies.Add(authCookie);
        }
随后,我们将 Login Action 的
FormsAuthentication.SetAuthCookie(model.Name, model.IsRememberMe);
替换为
SetAuthCookie(model.Name, model.IsRememberMe, model);
即可。
(2) 使 View、Controller 中都可以轻松访问当前用户的信息
为了能够将存入 Cookie 的 UserData 数据重新读取出来,我们要新建一个名为 ControllerBase 的类,并让我们系统中所有的 Controller 都继承自这个类。
namespace MyWebAppCustomForms.Controllers
{
    #region using directives

    using System;
    using Models;
    using System.Web.Mvc;
    using System.Web.Routing;
    using System.Web.Security;
    using Newtonsoft.Json;

    #endregion using directives

    public abstract class ControllerBase : Controller
    {
        public UserModel CurrentUser { get; set; }

        protected override IAsyncResult BeginExecute(RequestContext requestContext, AsyncCallback callback, object state)
        {
            if (requestContext.HttpContext.User.Identity is FormsIdentity identity)
            {
                var userData = identity.Ticket.UserData;
                if (!string.IsNullOrWhiteSpace(userData))
                {
                    this.CurrentUser = JsonConvert.DeserializeObject<UserModel>(userData);
                    this.ViewBag.CurrentUser = this.CurrentUser;
                }
            }
            return base.BeginExecute(requestContext, callback, state);
        }
    }
}
这样,我们就完成了所有操作,如果你需要在任意一个 Action 中获取当前 User 的信息,你只需要调用
this.CurrentUser
如果你需要在 View 中获取当前用户的信息,你只需要
@ViewBag.CurrentUser
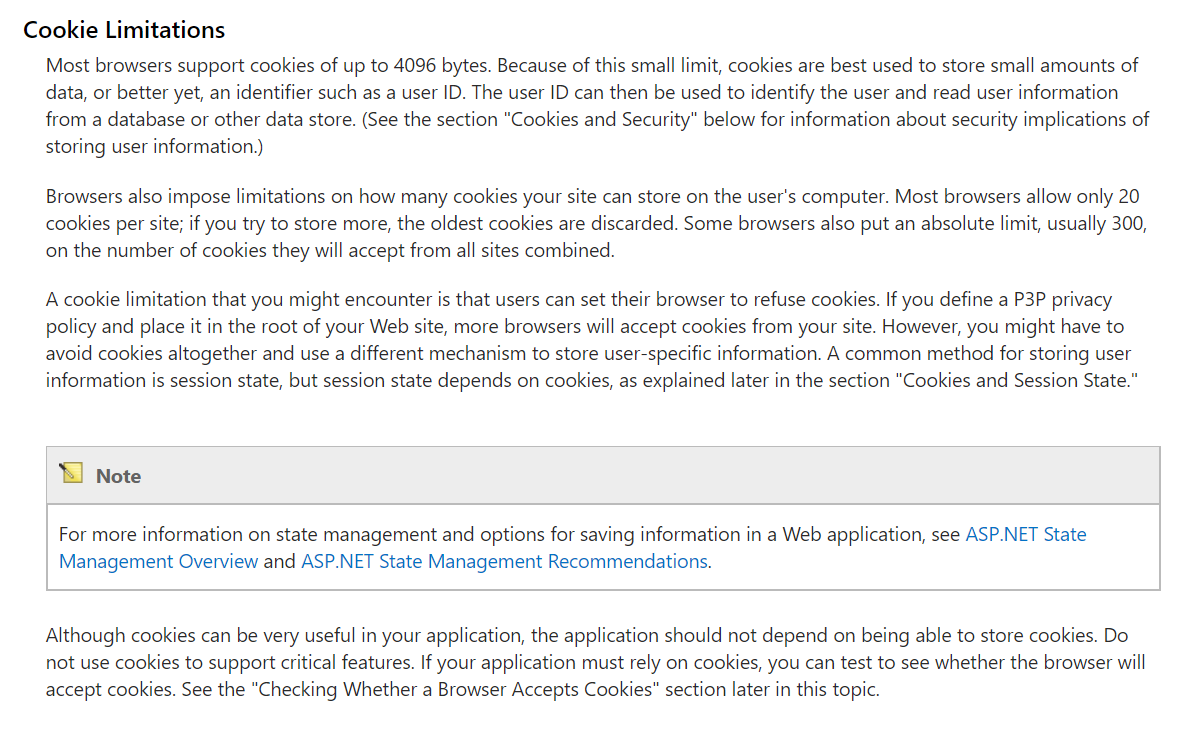
需要注意的是,我们不应该把过多的内容保存到 Cookie 中,比如用户头像等,虽然当 Cookie 内容过长时,.NET 会自动将其切分为多个 Cookie,但是,一般浏览器单个 Cookie 不能超过 4096 字节,且每个站点最多 20 个 Cookie 项目,所以,UserData 的大小是有存储上限的!切勿过分依赖 Cookie!
关于 Cookie 限制,可以参考:https://msdn.microsoft.com/en-us/library/ms178194.aspx
你可以从 GitHub 查看上述的演示代码:(Project: MyWebAppCustomForms)
https://github.com/imnista/MyWebAppDemo
与默认创建的 MVC 工程相比,改动只局限于以下文件:
- Web.config
- App_Start/FilterConfig.cs
- Controllers/LoginController.cs
- Controllers/BaseController.cs
- Views/Shared/_Layout.cshtml
- Views/Login/Index.cshtml
- Models/UserModel.cs