Quick Tips

891 次浏览

通过微信公众号客服 API 集成 OpenAI 的 AI 聊天机器人

有关 ChatGPT 的话题,最近十分火热,通过 Python 脚本编写了一个基于 和 OpenAI 的微信公众号服务器,从而支撑微信公众号集成 OpenAI 的智能聊天机器人的需求。代码如下,

  • 这里通过公众号方式,解决了 OpenAI 被封禁的问题;
  • 通过客服 API 解决了消息超过 5 秒,未回复会被报错的问题。
import threading
# https://github.com/openai/openai-python
# https://platform.openai.com

import openai
# https://github.com/offu/WeRoBot
# https://werobot.readthedocs.io/zh_CN/latest/
# 实例参考 https://blog.csdn.net/IkerIkerIker/article/details/110914641

import werobot
from werobot.replies import TransferCustomerServiceReply

WEB_HOST_URL = "0.0.0.0"
WEB_HOST_PORT = 80
WECHAT_APP_ID = "{{微信公众号的 APP ID}}"
WECHAT_APP_SECRET = "{{微信公众号的 APP SECRET}}"
WECHAT_ENCODING_AES_KEY = "{{微信公众号的 AES 加密密钥}}"
WECHAT_API_TOKEN = "{{微信公众号的 API 设置中配置的 Token,这个可以随意编写}}"
OPEN_AI_API_KEY = "{{ChatGPT 的 API KEY}}"

openai.api_key = OPEN_AI_API_KEY
robot = werobot.WeRoBot(token=WECHAT_API_TOKEN)

def get_chatgpt_response(prompt):
    response = openai.Completion.create(
        model="text-davinci-003",
        prompt=prompt,
        temperature=0,
        max_tokens=1024,
        top_p=1,
        frequency_penalty=0.0,
        presence_penalty=0.0,
    )
    message = response.choices[0].text
    return message.strip()

def post_wechat_customer_service_reply(messages):
    chatGptResponse = get_chatgpt_response(messages.content)
    # https://werobot.readthedocs.io/zh_CN/latest/client.html#
    # https://developers.weixin.qq.com/doc/offiaccount/Message_Management/Service_Center_messages.html
    # 获取 Access Token,发送消息的客服账户 等 API
    return robot.client.send_text_message(user_id=messages.source, content=chatGptResponse, kf_account=None)

@robot.handler
def hello(messages):
    thread = threading.Thread(
        target=post_wechat_customer_service_reply, args=(messages,))
    thread.start()
    # https://developers.weixin.qq.com/doc/offiaccount/Message_Management/Passive_user_reply_message.html
    # 假如服务器无法保证在五秒内处理并回复,必须做出下述回复,这样微信服务器才不会对此作任何处理,
    # 并且不会发起重试(这种情况下,可以使用客服消息接口进行异步回复),否则,将出现严重的错误提示: “该公众号暂时无法提供服务,请稍后再试”
    # 将消息转发至客服:
    # https://developers.weixin.qq.com/doc/offiaccount/Customer_Service/Forwarding_of_messages_to_service_center.html
    return TransferCustomerServiceReply(messages)

robot.config["HOST"] = WEB_HOST_URL
robot.config["PORT"] = WEB_HOST_PORT
robot.config["APP_ID"] = WECHAT_APP_ID
robot.config["APP_SECRET"] = WECHAT_APP_SECRET
robot.config["ENCODING_AES_KEY"] = WECHAT_ENCODING_AES_KEY
robot.run()
1,254 次浏览

中华人民共和国行政区划代码 Excel 整理版

根据中华人民共和国民政部 2020 年 12 月发布的“中华人民共和国县以上行政区划代码”(https://www.mca.gov.cn/article/sj/xzqh/2020/20201201.html),精心核对制作!

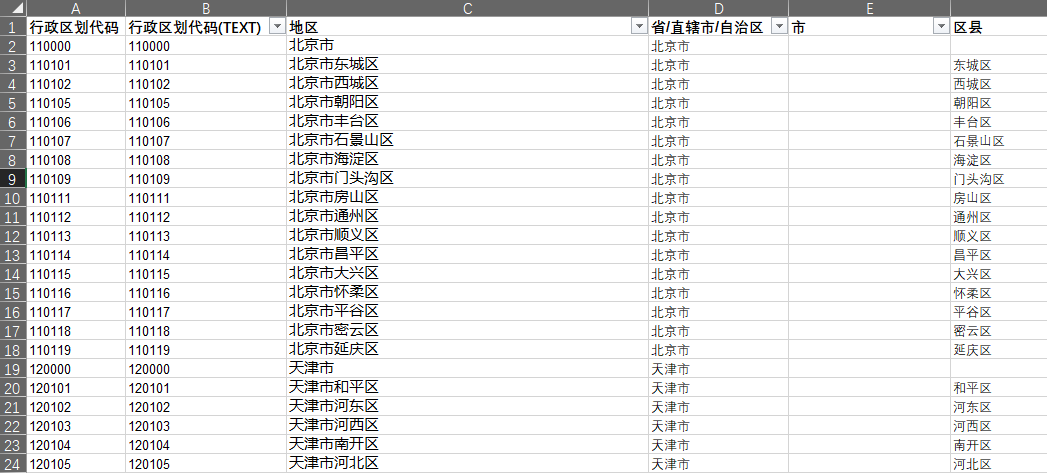
形式举例:

行政区划代码 行政区划代码(TEXT) 地区 省/直辖市/自治区 市 区县
210200 210200 辽宁省大连市 辽宁省 大连市
210202 210202 辽宁省大连市中山区 辽宁省 大连市 中山区
210203 210203 辽宁省大连市西岗区 辽宁省 大连市 西岗区
210204 210204 辽宁省大连市沙河口区 辽宁省 大连市 沙河口区
210211 210211 辽宁省大连市甘井子区 辽宁省 大连市 甘井子区
210212 210212 辽宁省大连市旅顺口区 辽宁省 大连市 旅顺口区

Excel Code for Administrative Divisions of PRC

下载地址: https://download.csdn.net/download/nista/85707643?spm=1001.2014.3001.5503

如何通过身份证号链接上述的 Excel 表格获取人员的籍贯?

  • A2 单元格为身份证所在单元格,注意,需要将其设置为 Text 文本 类型,例如,210102199001010011
  • B2 为身份证的前 6 位的行政区划代码,值为 =TEXT(LEFT(A2,6),0)
  • C2 为连接了上述 Excel Sheet 页 “China” 进行籍贯识别后的结果,将它的值设置为以下代码:
=IFERROR(
     VLOOKUP(
        B2,
        China!B:C,
        2,
        0
    ),
     CONCAT( "*(",
         IFERROR(
             VLOOKUP(
                CONCAT(
                    LEFT(
                        A2,
                        4
                    ),
                    "00"
                ),
                China!B:C,
                2,
                0
            ),
             IFERROR(
                 VLOOKUP(
                    CONCAT(
                        LEFT(
                            A2,
                            2
                        ),
                        "0000"
                    ),
                    China!B:C,
                    2,
                    0
                ), "<未找到>" 
            ) 
        ), ")" 
    ) 
)

这段代码会去查找行政区划代码对应的籍贯文字,如果无法找到,则回退到查找市县、如果依然无法查找到,则查询省。

343 次浏览

通过 Git 提交代码时,如何为某一个文件增加可执行权限?

有时候我们可能会提交一些需要在远端(例如 Jenkins CI 服务器等)Shell 环境下执行的脚本文件,我们可以在提交代码时,通过 Git 命令进行权限的修改(即使是在 Windows 环境下)

git update-index –chmod=+x

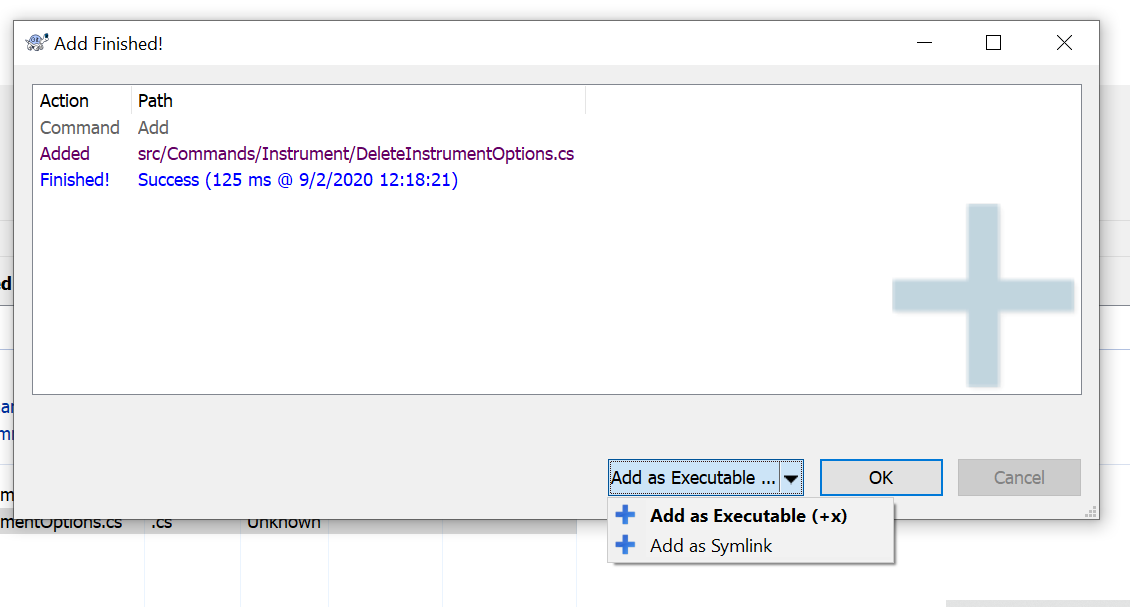
如果你习惯使用 TortoiseGit 管理你的代码,你也可以通过以下方式添加文件的可执行权限

TortoiseGit Add As Executable

110 次浏览

Azure VM 虚拟机的系统盘占用空间过大,如何裁剪节省成本?

我们在创建 Azure 云的 VM 虚拟机时,其自带的系统盘(C:)往往占用了过大的空间,产生很多额外的开销,我们可以通过如下的 PowerShell 脚本进行空间的裁剪,以优化节约花费!

具体操作步骤,请参考: https://jrudlin.github.io/2019-08-27-shrink-azure-vm-osdisk/

Shrink Azure VM System Disk PowerShell Script:

# Variables
$DiskID = "TODO: 形式如同: /subscriptions/203bdbf0-69bd-1a12-a894-a826cf0a34c8/resourcegroups/rg-server1-prod-1/providers/Microsoft.Compute/disks/Server1-Server1"
$VMName = "TODO: Azure VM NAME VVVVVV"
$DiskSizeGB = 32
$AzSubscription = "TODO: Azure Subscription NAME SSSSSS"

# Script
# Provide your Azure admin credentials
Connect-AzAccount

#Provide the subscription Id of the subscription where snapshot is created
Select-AzSubscription -Subscription $AzSubscription

# VM to resize disk of
$VM = Get-AzVm | ? Name -eq $VMName

#Provide the name of your resource group where snapshot is created
$resourceGroupName = $VM.ResourceGroupName

# Get Disk from ID
$Disk = Get-AzDisk | ? Id -eq $DiskID

# Get VM/Disk generation from Disk
$HyperVGen = $Disk.HyperVGeneration

# Get Disk Name from Disk
$DiskName = $Disk.Name

# Get SAS URI for the Managed disk
$SAS = Grant-AzDiskAccess -ResourceGroupName $resourceGroupName -DiskName $DiskName -Access 'Read' -DurationInSecond 600000;

#Provide the managed disk name
#$managedDiskName = "yourManagedDiskName" 

#Provide Shared Access Signature (SAS) expiry duration in seconds e.g. 3600.
#$sasExpiryDuration = "3600"

#Provide storage account name where you want to copy the snapshot - the script will create a new one temporarily
$storageAccountName = "shrink" + [system.guid]::NewGuid().tostring().replace('-','').substring(1,18)

#Name of the storage container where the downloaded snapshot will be stored
$storageContainerName = $storageAccountName

#Provide the key of the storage account where you want to copy snapshot. 
#$storageAccountKey = "yourStorageAccountKey"

#Provide the name of the VHD file to which snapshot will be copied.
$destinationVHDFileName = "$($VM.StorageProfile.OsDisk.Name).vhd"

#Generate the SAS for the managed disk
#$sas = Grant-AzureRmDiskAccess -ResourceGroupName $resourceGroupName -DiskName $managedDiskName -Access Read -DurationInSecond $sasExpiryDuration

#Create the context for the storage account which will be used to copy snapshot to the storage account 
$StorageAccount = New-AzStorageAccount -ResourceGroupName $resourceGroupName -Name $storageAccountName -SkuName Standard_LRS -Location $VM.Location
$destinationContext = $StorageAccount.Context
$container = New-AzStorageContainer -Name $storageContainerName -Permission Off -Context $destinationContext

#Copy the snapshot to the storage account and wait for it to complete
Start-AzStorageBlobCopy -AbsoluteUri $SAS.AccessSAS -DestContainer $storageContainerName -DestBlob $destinationVHDFileName -DestContext $destinationContext
while(($state = Get-AzStorageBlobCopyState -Context $destinationContext -Blob $destinationVHDFileName -Container $storageContainerName).Status -ne "Success") { $state; Start-Sleep -Seconds 20 }
$state

# Revoke SAS token
Revoke-AzDiskAccess -ResourceGroupName $resourceGroupName -DiskName $DiskName

# Emtpy disk to get footer from
$emptydiskforfootername = "$($VM.StorageProfile.OsDisk.Name)-empty.vhd"

# Empty disk URI
#$EmptyDiskURI = $container.CloudBlobContainer.Uri.AbsoluteUri + "/" + $emptydiskforfooter

$diskConfig = New-AzDiskConfig `
    -Location $VM.Location `
    -CreateOption Empty `
    -DiskSizeGB $DiskSizeGB `
    -HyperVGeneration $HyperVGen

$dataDisk = New-AzDisk `
    -ResourceGroupName $resourceGroupName `
    -DiskName $emptydiskforfootername `
    -Disk $diskConfig

$VM = Add-AzVMDataDisk `
    -VM $VM `
    -Name $emptydiskforfootername `
    -CreateOption Attach `
    -ManagedDiskId $dataDisk.Id `
    -Lun 63

Update-AzVM -ResourceGroupName $resourceGroupName -VM $VM

$VM | Stop-AzVM -Force


# Get SAS token for the empty disk
$SAS = Grant-AzDiskAccess -ResourceGroupName $resourceGroupName -DiskName $emptydiskforfootername -Access 'Read' -DurationInSecond 600000;

# Copy the empty disk to blob storage
Start-AzStorageBlobCopy -AbsoluteUri $SAS.AccessSAS -DestContainer $storageContainerName -DestBlob $emptydiskforfootername -DestContext $destinationContext
while(($state = Get-AzStorageBlobCopyState -Context $destinationContext -Blob $emptydiskforfootername -Container $storageContainerName).Status -ne "Success") { $state; Start-Sleep -Seconds 20 }
$state

# Revoke SAS token
Revoke-AzDiskAccess -ResourceGroupName $resourceGroupName -DiskName $emptydiskforfootername

# Remove temp empty disk
Remove-AzVMDataDisk -VM $VM -DataDiskNames $emptydiskforfootername
Update-AzVM -ResourceGroupName $resourceGroupName -VM $VM

# Delete temp disk
Remove-AzDisk -ResourceGroupName $resourceGroupName -DiskName $emptydiskforfootername -Force;

# Get the blobs
$emptyDiskblob = Get-AzStorageBlob -Context $destinationContext -Container $storageContainerName -Blob $emptydiskforfootername
$osdisk = Get-AzStorageBlob -Context $destinationContext -Container $storageContainerName -Blob $destinationVHDFileName

$footer = New-Object -TypeName byte[] -ArgumentList 512
write-output "Get footer of empty disk"

$downloaded = $emptyDiskblob.ICloudBlob.DownloadRangeToByteArray($footer, 0, $emptyDiskblob.Length - 512, 512)

$osDisk.ICloudBlob.Resize($emptyDiskblob.Length)
$footerStream = New-Object -TypeName System.IO.MemoryStream -ArgumentList (,$footer)
write-output "Write footer of empty disk to OSDisk"
$osDisk.ICloudBlob.WritePages($footerStream, $emptyDiskblob.Length - 512)

Write-Output -InputObject "Removing empty disk blobs"
$emptyDiskblob | Remove-AzStorageBlob -Force


#Provide the name of the Managed Disk
$NewDiskName = "$DiskName" + "-new"

#Create the new disk with the same SKU as the current one
$accountType = $Disk.Sku.Name

# Get the new disk URI
$vhdUri = $osdisk.ICloudBlob.Uri.AbsoluteUri

# Specify the disk options
$diskConfig = New-AzDiskConfig -AccountType $accountType -Location $VM.location -DiskSizeGB $DiskSizeGB -SourceUri $vhdUri -CreateOption Import -StorageAccountId $StorageAccount.Id -HyperVGeneration $HyperVGen

#Create Managed disk
$NewManagedDisk = New-AzDisk -DiskName $NewDiskName -Disk $diskConfig -ResourceGroupName $resourceGroupName

$VM | Stop-AzVM -Force

# Set the VM configuration to point to the new disk  
Set-AzVMOSDisk -VM $VM -ManagedDiskId $NewManagedDisk.Id -Name $NewManagedDisk.Name

# Update the VM with the new OS disk
Update-AzVM -ResourceGroupName $resourceGroupName -VM $VM

$VM | Start-AzVM

start-sleep 180
# Please check the VM is running before proceeding with the below tidy-up steps

# Delete old Managed Disk
Remove-AzDisk -ResourceGroupName $resourceGroupName -DiskName $DiskName -Force;

# Delete old blob storage
$osdisk | Remove-AzStorageBlob -Force

# Delete temp storage account
$StorageAccount | Remove-AzStorageAccount -Force
167 次浏览

OAuth 2.0 Implicit Grant Flow “隐式授权流” 不再被推荐!

Apple Safari 已经提供默认启用的隐私保护功能,称为智能跟踪保护 (ITP)。 ITP 会阻止“第三方”的 Cookie – 包含在跨域请求中的 Cookie。
常见的用户跟踪形式是:在后台将一个 iframe 加载到第三方站点,并使用 Cookie 在整个 Internet 中关联用户。【遗憾的是,此模式也是单页应用 (SPA) 中实现Oauth 2.0 的隐式流(Implicit Grant Flow)的标准方式】

当浏览器阻止第三方 Cookie 以阻止用户跟踪时,SPA 也会中断。【并非只有 Safari】通过阻止第三方 Cookie 来增强用户隐私保护。Brave 默认已阻止第三方 Cookie,而 Chromium(基于 Google Chrome 和 Microsoft Edge 的平台)也已宣布,在 2023 年年底停止支持第三方 Cookie。

因为上述的从浏览器中删除第三方 Cookie 的行为,隐式授权流不再是合适的身份验证方法。 如果没有第三方 Cookie,隐式流的无提示 SSO 功能将不起作用,导致应用程序在尝试获取新令牌时中断。 强烈建议你让所有新的应用程序都使用 【授权代码流(Authorization Code Flow)】,并让现有的单页应用也开始迁移到授权代码流。

这对于所有基于 SPA 开发并包含联合认证登录方式的网站,【都会产生重大影响】,需要你对项目进行重大重构和修改。

相关参考

Apple Safari 已经启用此限制,Chromium 将在 2023 年底前启用。这是一个类似于“微软将会从 Windows 中移除 IE” 一个级别的信息,请大家务必注意。

266 次浏览

VMware 提示与 Device/Credential Guard 不兼容

当我们在较新的 Windows 10 版本 (1909 或更新)使用 VMware Workstation(无论是 Pro 还是 Player 版本)时,会出现 WMware 与 Windows 自带的 Hyper-V 组件互不兼容的问题,从而报错:

“VMware Workstation and Device/Credential Guard are not compatible. VMware Workstation can be run after disabling Device/Credential Guard. Please visit http://www.vmware.com/go/turnoff_CG_DG for more details.”

解决方法:

  1. 开始 – 运行 (Win + R) – 键入 cmd as admin
  2. 在命令提示符键入 bcdedit /set hypervisorlaunchtype off
  3. 重启电脑,即可。

存在的问题:

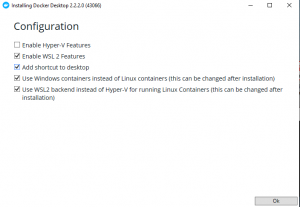
禁用 Hyper-V 将直接导致依赖于 Hyper-V 的 Docker Desktop 无法正常启用,我们可以下载体验(Edge)版的 Docker Desktop 来禁用与 Hyper-V 相关的功能,并改用 Windows Container。

相关资料:

https://stackoverflow.com/questions/50374506/vmware-workstation-cannot-run-on-windows-10-after-recent-update-to-windows-10
https://docs.microsoft.com/en-us/virtualization/windowscontainers/quick-start/set-up-environment?tabs=Windows-10-Client&redirectedfrom=MSDN
https://www.cnblogs.com/ups216/p/6385663.html

1,807 次浏览
1,139 次浏览

GitHub 提交忽略规则

我们可以在代码库的根目录创建一个名为 “.gitignore” 的文件,并在其中配置哪些文件或文件夹可以在提交的时候被忽略。以 .NET 项目为例,我们需要忽略与 VS 或 调试编译有关的 bin\obj\packages.vs 等文件或文件夹,则只需要:

# Emacs backup files
*~

appsettings.local.json
local.settings.json
*.pfx


# The below are a selected subset from
# https://github.com/github/gitignore/blob/master/VisualStudio.gitignore


# Visual Studio user-specific files
*.suo
*.user
*.userosscache
*.sln.docstates

# Build results
*.dll
*.dll.config
*.exe
*.exe.config
[Dd]ebug/
[Dd]ebugPublic/
[Rr]elease/
[Rr]eleases/
x64/
x86/
bld/
[Bb]in/
[Oo]bj/
[Ll]og/

# Visual Studio 2015/2017 cache/options directory
.vs/

# Visual Studio 2017 auto generated files
Generated\ Files/

# MSTest test Results
[Tt]est[Rr]esult*/
[Bb]uild[Ll]og.*

# .NET Core
project.lock.json
project.fragment.lock.json
artifacts/
**/Properties/launchSettings.json

# Files built by Visual Studio
*_i.c
*_p.c
*_i.h
*.ilk
*.meta
*.obj
*.pch
*.pdb
*.pgc
*.pgd
*.rsp
*.sbr
*.tlb
*.tli
*.tlh
*.tmp
*.tmp_proj
*.log
*.vspscc
*.vssscc
.builds
*.pidb
*.svclog
*.scc

# Visual Studio profiler
*.psess
*.vsp
*.vspx
*.sap

# Visual Studio Trace Files
*.e2e

# Visual Studio code coverage results
*.coverage
*.coveragexml

# Click-Once directory
publish/

# Publish Web Output
*.[Pp]ublish.xml
*.azurePubxml
# Note: Comment the next line if you want to checkin your web deploy settings,
# but database connection strings (with potential passwords) will be unencrypted
*.pubxml
*.publishproj

# Microsoft Azure Web App publish settings. Comment the next line if you want to
# checkin your Azure Web App publish settings, but sensitive information contained
# in these scripts will be unencrypted
PublishScripts/

# NuGet Packages
*.nupkg
# The packages folder can be ignored because of Package Restore
**/[Pp]ackages/*
# except build/, which is used as an MSBuild target.
!**/[Pp]ackages/build/
# Uncomment if necessary however generally it will be regenerated when needed
#!**/[Pp]ackages/repositories.config
# NuGet v3's project.json files produces more ignorable files
*.nuget.props
*.nuget.targets

# Microsoft Azure Build Output
csx/
*.build.csdef

# Microsoft Azure Emulator
ecf/
rcf/

# Visual Studio cache files
# files ending in .cache can be ignored
*.[Cc]ache
# but keep track of directories ending in .cache
!*.[Cc]ache/

# Node.js Tools for Visual Studio
.ntvs_analysis.dat
node_modules/

注意,按行配置约束,一行一个。